Pumpkin Soup

Pumpkin soup

Pumpkins are not just for carving and leaving them to die on one’s doorstep. I had bought a few sugar pie pumpkins a few months back for stuffing with chunky croutons and cheese. I had one that lingered in my kitchen though, and on this grey day (at least in my neck of the woods) soup sounded just perfect.

You’ll need:

  • 2-3 lb sugar pie pumpkin, cut into large cubes
  • 2 cups of sweet potatoes, cubed
  • 1 large russet potato
  • 5 cups of low-sodium stock, chicken or vegetable
  • 1 cup of yellow onion, chopped
  • 2 tsp garlic
  • 1 tsp ginger
  • 1 tsp cumin
  • 1/4 tsp cayenne pepper
  • salt and pepper
  • olive oil

To make:

Pre-heat your oven to 400 degrees.

First roast the pumpkin, sweet potatoes, and potato. Make sure to cut up everything into similarly sized pieces. I find it easier to leave the pumpkin’s skin on and cut it off later, but peel the other tubers. Toss the cubes with 2 tablespoons of olive oil. Lightly sprinkle salt and pepper. You can even omit the salt entirely if you wish. The broth will add enough saltiness to the soup.

Roast for 45 minutes and toss the cubes halfway through the process to bake evenly. Pull out and set aside.

Meanwhile, chop the onions, garlic, and ginger. After the cubes have sufficiently cooled, peel off the pumpkin skin.

On medium heat, saute the onions, garlic, and ginger with olive oil for 3 minutes. Add in all of your cubes, 4 cups of stock, cayenne, and cumin. Let simmer for 15 minutes. (I also had thrown in some leftover sweet potatoes that I had roasted earlier with thyme and garlic, but I think the soup would taste just as good without the thyme.)

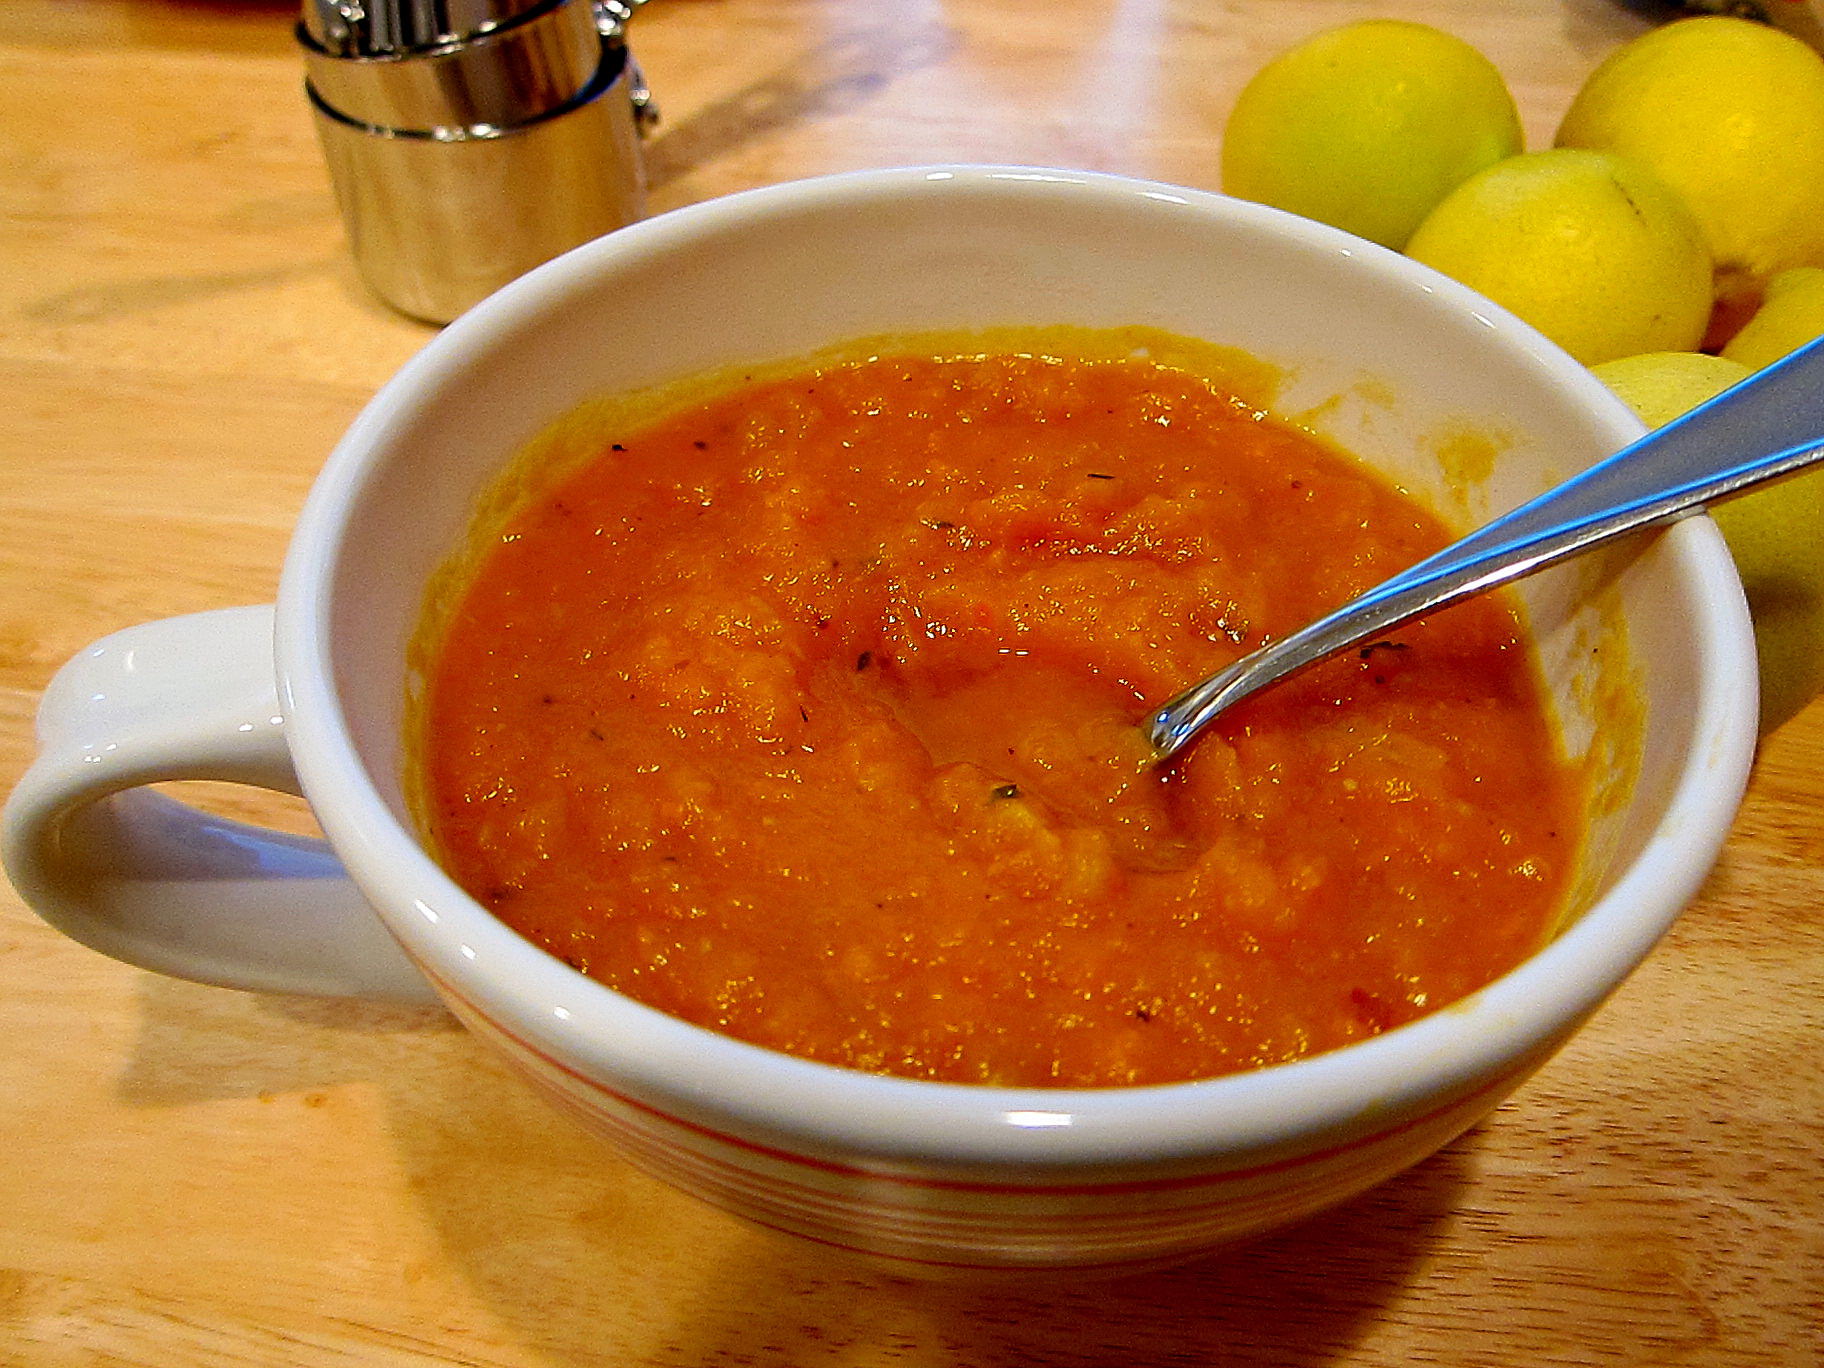
Turn down the heat to low or off. You can use an immersion blender or transfer everything to a blender or food processor. Blend it all together. Add the additional cup of stock (or more) if necessary, depending on how soupy you like it. Season with additional salt and pepper if desired.

You can certainly substitute a cup of cream for the stock. I left it out, however, in a baby-step attempt to detox from the holidays.

If you are planning to plant a summer/fall garden, don’t forget to keep some of the pumpkin seeds for use later.

Asparagus with Herbs and Anchovies

If you don’t like anchovies, this recipe is definitely not for you. Somewhere I had seen a recipe that used a “salsa” of many herbs and anchovies. I wish I could find it again and post it, but lacking that I created a variation on that mixture.

My version of this salsa was more to taste than exacting. I julienned basil and chopped cilantro, parsley, arugula, and rosemary. I then chopped half a can of anchovies and added those with about 1/2 a tablespoon of olive oil. You can certainly use the oil from the anchovy can – I have also tried that, too. Add some freshly ground pepper, mix your herbs and anchovies together, and you’re done with the salsa. You can add salt, but I find it unnecessary because of the salty anchovies.

Next, I chopped a bunch of asparagus into bite-sized pieces (and I had snapped the stems off before chopping). I sauteed them with olive oil and garlic only for a few minutes so that the asparagus was still crunchy, but not soggy.

Then, I married the salsa with the asparagus. Very easy to do and very flavorful. I have also tried the salsa with roasted broccoli, which I think tastes even better.

Pasta sauce with shredded carrots and zucchini

Image

Who knew that shredded carrots could be entirely exciting in pasta sauce??? Mario Batali, that’s who. In the last issue of Lucky Peach I came across one of his recipes for pasta sauce. To it, he adds shredded carrots, which give the sauce some fun texture and subtle carroty flavor. I had some zucchini and threw that in as well. I didn’t have time to make his sauce so I just mixed the shredded veggies into a bottled sauce. Give it a try!

Mark Bittman’s Roasted Asparagus with Crunchy Parmesan

Asparagus – the time is now!  Mark Bittman says that frankly, anything is good with parmesan on top.  He might be right. Nonetheless, this is a great, simple way to enjoy the season’s best offerings:

http://video.nytimes.com/video/2012/05/01/dining/100000001453916/asparagus-gratin.html

I had not thought about peeling away the top layer of the asparagus, but I’m going to start doing that with my next batch of asparagus. Should be pretty darn tasty.

Spring cleaning (freezer edition): buffalo burgers

Apart from my pantry, my freezer is an entirely different beast to tame. There are times when I don’t want to, and can’t, pull things out of my freezer because I just know everything will come tumbling out of it. Feeling brave, however, I recently pulled the close-to-freezer-burned package of ground buffalo out of there. I have never eaten buffalo, which is exactly the reason why I left it in there for so long. In fact, I only recently started to eat meat after a 12 year hiatus so I also felt a little shy about it.

I had been thinking for some time about what to do with the ground buffalo. I kept wondering if I would even like it. In the end, I made buffalo burgers. I diced half a yellow onion, added a few teaspoons of pepper and salt, and an egg – that was about it. On top, I melted a few slices of cheddar.

I have to say, the buffalo burger wasn’t all that bad. Without having a memory of what beef tasted like, it is hard for me to describe what buffalo tasted like. I can only say that the meat was not that greasy and that the flavor was rich and a tad bit smokey. Although my overall experience with buffalo wasn’t bad, I can’t say that I’ll be making more space in my freezer for it.


Spring cleaning: whole wheat mac and cheese

Macaroni and cheese is a dish that I drool over. The problem is that I don’t often have the time to make a big production out of it by melting the butter, adding flour, etc. I did, however, have on hand a box of whole wheat elbow macaroni in my pantry and some extra-sharp cheddar. So, I opted to make a very simple version of mac and cheese. A relative of mine makes it this way – with just pasta, cheese, milk, and pepper – and it is so good that I really don’t miss the added fat and calories of butter and flour. The cheese that goes into this dish has enough creaminess for me.

What you’ll need:

  • one 16 ounce box of whole wheat elbow macaroni (you can certainly use another kind of pasta such as penne or shells)
  • 3/4 of a pound of cheese (you can use any kind really, but I like to use a sharp cheddar cheese)
  • 1 teaspoon of paprika
  • 2 teaspoons of pepper
  • 1 cup of milk

Preheat your oven to 350 degrees.

Cook the pasta to al dente. Drain and let it cool. While you’re waiting for it to cool, cut the cheese into blocks, or you can grate the cheese, whichever you prefer. Toss your pasta and cheese together, also adding 1/2 cup of milk, pepper, and paprika. Then, place it all into a 9×13 baking dish and cover it. 20 minutes later, your cheese will be fully melted and delicious looking. Add 1/2 cup of milk and mix everything around, making sure you evenly mix the cheese with the pasta. 10 minutes later, take off the cover and let the top brown for the last 15 minutes. You can also mix it around and add any more milk if the mixture looks like it’s drying out.

Adding the paprika really brought out the whole-wheat taste in the pasta. If you don’t want to enhance the whole-wheat taste, and are really just using the pasta as a vehicle for the cheese, then feel free to omit the paprika and certainly add more cheese.

Don’t throw away your chicken bits!

My mom is so resourceful, it’s crazy.  Don’t even think about throwing away roasted chicken bones.  She might come after you.  With the chicken bones, my mom makes a dish called “jook” (ryhmes with “book”).

To make this, you’ll need to find a decent-sized pot.  Mine is 3 quarts, but you can certainly use a bigger one.

Next steps:

First and foremost, you’ll want to soak your rice. You’ll need to soak it for 4 hours before cooking. Most people are amazed when I tell them to soak their rice. Your rice will be so much tastier and softer if you do this in advance, especially brown rice.

Next, place your roasted chicken bones and any chicken juices into a pot.  Knowing that I’m going to make jook, I usually leave some meat on the bones. Add 8 cups of water to your pot.  Sometimes I add veggie or chicken stock, depending on if I have it on hand. Also add one 2 inch piece of ginger (sliced in half to release more flavor) and jujubes (the dates, not the candy).  If you can’t find jujubes, don’t worry, just do without them.  They taste slightly like ginger so if you only have the ginger, it’ll still taste awesome. If you have never seen jujubes, they look like this:

Bring to a boil, then reduce the heat to a simmer for an hour and a half. You’ll end up with a stock that looks like this, having an amber color:

While you’re waiting for the stock, cook your rice. I have a wonderful rice cooker that sings a jingle when the rice is done. In fact, it’s a choo-choo train sound, which is entirely entertaining. For this step, don’t worry if you have rice that is too dry or too wet. It doesn’t really matter since it’ll be going into your pot and cooking longer.

Alright, we’re almost done. When your stock is ready, pull out everything from the pot. The finished product will be ruined if you unintentionally bite into a huge chunk of ginger. Take any remaining meat off the bones and throw it back into the pot. I like to shred the chicken a little before I throw it back into the pot. Add the 2 cups of cooked rice into the pot at this point. Bring to a boil, then reduce to a simmer for an hour and a half. Then, eat! The finished product should be oatmeal-like or similar to cream of wheat. It is fantastic to eat with kimchi and/or roasted seaweed on top.

I know this sounds like a lot of effort (and I’ll admit that it kind of is), but it is worth it. And, you can feel good about not letting any part of the chicken go to waste! The taste should have a mild chicken flavor with a slight bite of ginger to it. You’ll have at least 5 hearty servings of jook on hand with this recipe.

Eggplant Moussaka

For better or for worse, I’m mostly a creature of habit.  Near my house there is a Lebanese restaurant that I frequent.  I have tried a variety of things on their menu, and they were all very good, but I usually end up wishing that I could have the eggplant moussaka.  I have ordered the eggplant moussaka so many times that the waitress, the chef’s daughter, hands me the menu and at the same time gives me this look that practically says, “Let’s cut to the chase.  You want the eggplant.”  I love places like these.  I don’t even have to speak; she already knows.

I’ve asked the chef’s daughter how I can make this dish at home.  She told me how to do it in the abstract and I’m still trying to figure it out.  This is my best attempt, short of just asking for a take-out box and passing it off as my own.

You’ll need:

  • 2 large eggplant
  • 3 medium bell peppers, sliced into strips (any color you want, but traditionally I’ve seen this dish with green peppers)
  • 5 large tomatoes , diced (alternatively, you can use a 28 ounce can of diced tomatoes)
  • 1 medium yellow onion (a Spanish onion might be nice here too)
  • 1 cup of garbanzo beans
  • 4 garlic cloves, minced
  • 2 teaspoons of cumin
  • 3 tablespoons of tomato paste
  • 1/3 of water or vegetable stock
  • 1/4 cup parsley, chopped
  • salt and pepper

Pull it all together:

Slice the eggplant into rounds, about 1/2 an inch thick.  Slather with some olive, salt them and bake at 350 degrees for 20 minutes.  Halfway through I usually turn them over so they cook evenly.  (I have also tried frying the rounds, but it requires much more oil and the taste didn’t seem to matter in the end.)

In the meantime, saute the onion on medium heat with olive oil for 5 minutes, until brown.  Add the minced garlic and cook together for 1 minute.  Next, add the diced tomatoes, peppers, garbanzo beans, tomato paste, cumin, salt, and pepper (add the S/P to taste).  If you are using canned tomatoes, then you won’t need to add the 1/4 cup of water or stock.  Otherwise, go ahead and add the liquid.  Cook the mixture for 5 minutes.

When assembling, I like to think of it like it’s a lasagna.  Spread the tomato mixture on the bottom of a 9×13 inch baking dish.  Layer the eggplant.  Spread some more tomato mixture.  Add another eggplant layer.  Top off with the remainder of the tomato mixture.

Cover with foil at first and then uncover halfway through baking.  Bake for 30 minutes at 350 degrees.


Spring cleaning: whole wheat lasagna noodles

I’ve had a box and a half of whole wheat lasagna noodles for some time now.  They weren’t getting any younger just sittin’ there.  The problem, or so I thought, was that I didn’t have any cheese.  It turns out that cheese-less lasagna is pretty dang good.  I had 2 small eggplants and some zucchini lying around as well so I used my mandolin and sliced them length-wise.  With all fingers accounted for, I constructed the lasagna, layering the noodles with the eggplant and zucchini in between, just like I would if I had cheese on hand.  And, I topped it off with sliced roma tomatoes.

It turned out fantastic.  The creaminess of the eggplant isn’t exactly a perfect substitute, but I felt a little less guilty going for seconds knowing that I didn’t just eat my year’s allotment of saturated fats in one sitting.  I also used a bottle of Trader Joe’s tomato basil marina that was in my pantry.  Killing 2 birds with one stone – this is what I call spring cleaning.